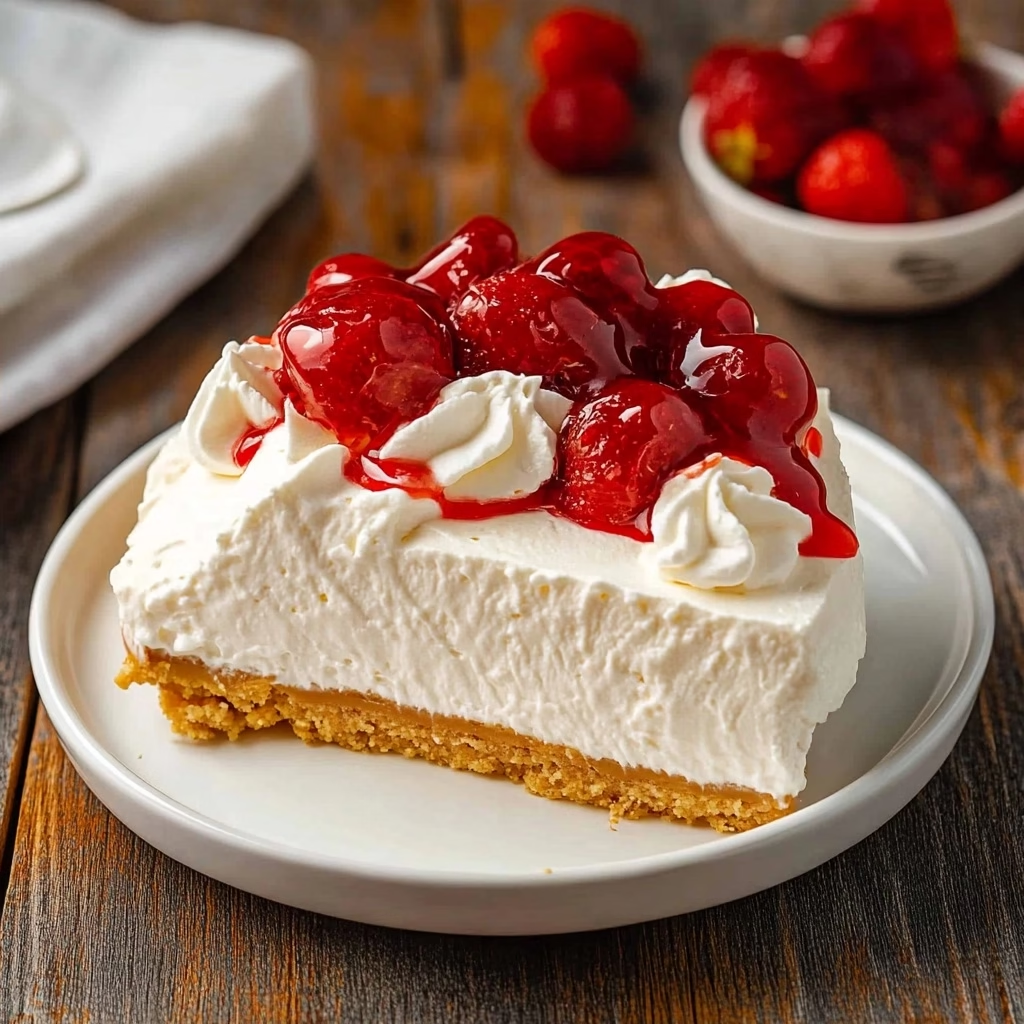
No bake cheesecake with Cool Whip is the ultimate solution for those quiet afternoons when you crave something sweet but want to keep the kitchen cool and calm. This delightful dessert brings together a buttery, golden crust and a velvety smooth filling that feels like a gentle embrace on a warm day. It is the kind of recipe that turns simple ingredients into a heartfelt gesture of care for your family or friends.
When you prepare this no bake cheesecake with Cool Whip, you are choosing a path of ease and elegance. The light, airy texture of the whipped topping beautifully complements the richness of the cream cheese, creating a balanced bite that lingers just long enough to make you smile. Whether you are hosting a casual gathering or simply treating yourself to a well-deserved moment of peace, this dessert fits perfectly into the rhythm of a slow, intentional life.
What is No Bake Cheesecake With Cool Whip?
This recipe is a classic, simplified version of the traditional baked cheesecake, designed specifically for those who prefer convenience without sacrificing flavor. Instead of relying on eggs and a long bake in a hot oven, this version uses the stability of cream cheese mixed with the lightness of whipped topping to achieve a firm yet creamy set. It represents a wonderful evolution of home baking, where the goal is to spend less time managing a timer and more time enjoying the process.
The foundation of the dish is a crumbly graham cracker base, which provides a lovely textural contrast to the silky filling. By incorporating high-quality cream cheese and vanilla, the dessert retains that signature tang and deep flavor profile that we all associate with comfort food. It is a timeless staple for many households because it reliably delivers a luxurious experience with minimal effort.
Reasons to Try No Bake Cheesecake With Cool Whip
Choosing to make this dessert is an act of kindness toward yourself, especially during busy weeks when you need a reliable win in the kitchen. It is incredibly beginner-friendly, requiring no complex techniques like water baths or temperature monitoring, which means you can focus entirely on the joy of creating something beautiful from scratch.
Beyond the simplicity, this cheesecake is remarkably versatile. It serves as a perfect blank canvas for your favorite seasonal fruits, drizzles, or even chocolate shavings. Because it is chilled rather than baked, the flavors have time to meld together in the silence of your refrigerator, resulting in a dessert that feels cohesive, refreshing, and deeply satisfying for anyone lucky enough to get a slice.
Ingredients Needed to Make No Bake Cheesecake With Cool Whip
- 1 ½ cups graham cracker crumbs (finely processed for a uniform base)
- ⅓ cup melted butter (unsalted is best for controlling salt levels)
- 1 tablespoon granulated sugar (for a touch of extra sweetness in the crust)
- 24 ounces cream cheese, softened to room temperature (essential for a smooth, lump-free filling)
- 1 cup powdered sugar (sifted to ensure a silky texture)
- 1 teaspoon vanilla extract (pure vanilla offers the best depth)
- 8 ounces Cool Whip (thawed in the refrigerator before using)
- 20 ounces cherry pie filling (the perfect tangy contrast to the sweet cream)
Instructions to Make No Bake Cheesecake With Cool Whip – Step by Step
Step 1: Begin by preparing the base of your dessert. In a medium mixing bowl, combine the graham cracker crumbs, melted butter, and the tablespoon of granulated sugar. Stir everything together until the crumbs look like wet sand, ensuring every particle is coated in butter for a firm set.
Step 2: Transfer this crumb mixture into a 9-inch springform pan. Use the bottom of a measuring cup to press the crumbs firmly and evenly across the bottom and slightly up the sides if you prefer. Once it feels secure and level, place the pan into the refrigerator to chill while you work on the creaminess of the filling.
Step 3: In a separate large bowl, take the softened cream cheese and the powdered sugar. Using a hand mixer on low to medium speed, beat them together until the mixture is perfectly smooth and free of any small lumps. Patience here ensures the most luxurious mouthfeel.
Step 4: Gently stir in the vanilla extract. Afterward, add the thawed Cool Whip to the bowl. Use a spatula to carefully fold the whipped topping into the cream cheese mixture using broad, sweeping motions. You want to maintain the airiness, so take your time until the mixture is uniform and light.
Step 5: Carefully spread the cream cheese mixture over your chilled graham cracker crust, smoothing out the top with your spatula. Once it is level, return the pan to the refrigerator. Allow it to set for at least three hours, which is the secret to a clean slice when you are ready to serve.
Step 6: When you are ready to share your masterpiece, release the sides of the springform pan with care. Spoon the cherry pie filling evenly over the top, letting it settle into the creamy surface. Serve cold and enjoy the quiet satisfaction of a perfect dessert.
Chef’s Tips for a Perfect Result
- Always bring your cream cheese to room temperature before mixing, as this prevents lumps and ensures the smoothest possible texture.
- Make sure to thaw the Cool Whip completely in the refrigerator, rather than on the counter, to keep it stable and airy.
- If your crust feels crumbly after pressing, chill it for an extra 15 minutes to allow the butter to solidify properly.
- Sift your powdered sugar before adding it to the cream cheese to avoid any small, stubborn sugar pockets in your final filling.
Variations and Substitutions
- Fruit Topping Swap: Instead of cherry, try fresh macerated strawberries, blueberries, or even a tart lemon curd for a bright, sunny flavor.
- Chocolate Crust: Replace the graham crackers with chocolate wafer crumbs to create a rich, indulgent base that pairs wonderfully with berry toppings.
- Sugar-Free Option: Use a granulated sweetener in the crust and a powdered sugar substitute in the filling, and ensure your pie topping is a sugar-free preserve version.
How to Serve and Pair
This cheesecake is best served chilled, perhaps with a warm cup of herbal tea or a light coffee during a quiet afternoon break. It is the perfect centerpiece for a family gathering, as it can be plated elegantly on a simple white dish. For an extra touch of beauty, serve with a small sprig of fresh mint or a dusting of cinnamon to highlight the sweetness.
Storage and Reheating
Refrigerator
Keep your cheesecake in an airtight container or wrap the pan tightly with plastic wrap for up to 4 days. It will stay firm and delicious, tasting even better after a night in the cold.
Freezer
You can freeze the cheesecake for up to a month. Wrap it securely in multiple layers of plastic wrap and a layer of foil to prevent freezer burn. Thaw in the refrigerator overnight before topping with fresh fruit.
Reheating
This dessert is intended to be enjoyed cold, so reheating is never recommended as it would compromise the light, airy structure of the cream cheese and whipped topping mixture.
Nutritional Values
- Calories: 643kcal
- Protein: 8g
- Carbohydrates: 60g
- Fat: 42g
- Fiber: 1g
Approximate values.
Frequently Asked Questions (FAQ)
Can I use Greek yogurt instead of cream cheese?
You can use Greek yogurt, but it will significantly alter the texture and flavor, resulting in a much softer, tangier dessert that may not set as firmly as the traditional version.
How do I know when the cheesecake is perfectly set?
The cheesecake is ready when the center feels firm to the touch and does not jiggle excessively when you gently nudge the side of the pan.
Why is my filling lumpy?
Lumpy filling usually happens when the cream cheese was too cold before mixing or was not beaten thoroughly enough before adding the whipped topping.
Can I make this a day in advance?
Yes, this dessert is actually best when made at least 24 hours in advance, as the flavors meld and the crust softens just the right amount in the refrigerator.
What is the best way to cut clean slices?
For the cleanest slices, dip a sharp knife into hot water, wipe it dry, and cut through the cheesecake, cleaning the blade between every single slice.
Conclusion
This no bake cheesecake with Cool Whip is a testament to the joy that simple, thoughtful recipes can bring to our daily lives. With its creamy texture and comforting flavor, it is sure to become a favorite in your kitchen for years to come. I invite you to slow down, embrace the process, and share this lovely dessert with the people who make your world a little brighter.
Print
Classic No Bake Cheesecake with Cool Whip
- Prep Time: 20
- Total Time: 260
- Yield: 8 servings 1x
- Category: desserts
- Method: No-Bake
- Cuisine: American
- Diet: Vegetarian
Description
Indulge in this effortlessly elegant no-bake cheesecake, a perfect treat for those who cherish a smooth, velvety texture without the fuss of an oven. With a buttery graham cracker crust and a light, airy filling made from cream cheese and fluffy whipped topping, this dessert is a masterclass in simplicity. It is the ultimate comfort food for quiet afternoons, offering a refreshing and sophisticated balance of tang and sweetness that is sure to delight your family and friends.
Ingredients
1 1/2 cups graham cracker crumbs
1/3 cup unsalted butter, melted
1 tablespoon granulated sugar
16 oz cream cheese, softened
1/2 cup granulated sugar
1 teaspoon vanilla extract
8 oz whipped topping (Cool Whip), thawed
Instructions
In a medium bowl, combine graham cracker crumbs, melted butter, and 1 tablespoon of sugar until well moistened.
Press the crumb mixture firmly into the bottom of a 9-inch pie dish to form an even crust.
In a large mixing bowl, beat the softened cream cheese, 1/2 cup sugar, and vanilla extract together until completely smooth and creamy.
Gently fold the thawed whipped topping into the cream cheese mixture until fully combined and light.
Pour the filling over the prepared crust, smoothing the top with a spatula.
Refrigerate for at least 4 hours, or until set, before slicing and serving.
Notes
Ensure the cream cheese is at room temperature to avoid lumps in your filling. For added texture, garnish the top with fresh berries or a drizzle of fruit coulis just before serving. Keep refrigerated until ready to eat.
Nutrition
- Serving Size: 1 slice
- Calories: 320
- Sugar: 22g
- Sodium: 280mg
- Fat: 21g
- Saturated Fat: 12g
- Carbohydrates: 28g
- Fiber: 1g
- Protein: 4g
- Cholesterol: 65mg